
Typingvid is a command line utility that allows users to quickly generate typing animation videos using different keyboard layouts and themes. This page documents everything that one needs to know to create their own animations, extend the tool by adding new layouts, or contribute to the further development of the project.
For a quick tour of the tool’s capabilities, jump to the Examples section.
Typingvid is open-source and licensed under the MIT license. You can browse the tool’s source code on Github.
Installation
Using a package installer
The latest stable version of the script is available on the Python Package Index (PyPI) and can easily be installed using your favorite Python package installer (e.g. pip):
pip install typingvid
or:
python3 -m pip install typingvid
To check If everything went smoothly, you can try running:
typingvid --help
From source
Another option is to clone the entire GitHub repository of the project as follows:
git clone https://github.com/GavalasDev/typingvid
cd typingvid
chmod +x typingvid.py
./typingvid.py --help
Usage
The standard format of a typingvid command is the following:
typingvid -t TEXT [-l LAYOUT] [-o OUTPUT] [OPTIONS]
To see all available options, use:
typingvid --help
For example:
typingvid -t "hello world"
will generate an animation video using the default layout (en) and store it at the default output location (output.mp4).
The extension of the OUTPUT variable (option -o) defines the type of the output file. For example, to generate a simple GIF:
typingvid -t "lorem ipsum" -o "/path/to/file.gif"
For more examples, see the Examples section.
Understanding layouts
Typingvid was designed for multiple layout support since the very beginning. Each layout consists of two core files, a YAML file describing the properties of the layout (stored under directory layouts/) and an SVG file describing the looks of the layout (stored under directory assets/).
Single language layouts
The simplest (and most commonly needed) case is single language layouts. As an example, we’ll look into the inner workings of the en layout, describing the most common English keyboard layout (QWERTY):
YAML
# contents of file layouts/en.yml
file: keyboard-en.svg

fonts:
  - Noto-Sans-Mono
The YAML file describing a single language layout should include two fields:
- file: name of the SVG file to be used with this layout (relative to
assets/) - fonts: a list containing a single font name available on the user’s device (NOTE: including more than one font converts the layout into a multi-language layout)
SVG
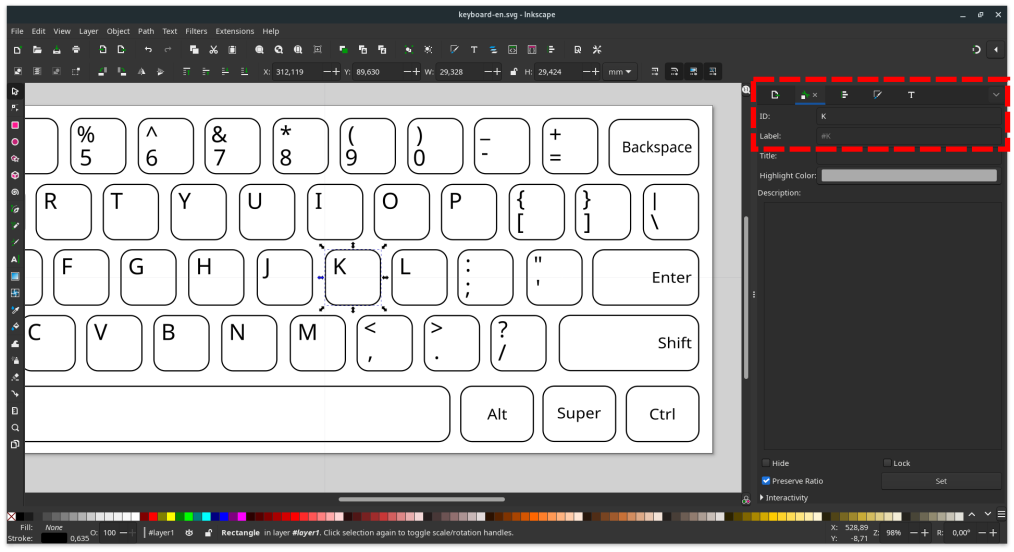
The SVG file ultimately defines how the keyboard will look in the final video. Extra attention should be paid to two important details:
- The dimensions of the file should closely match those of the provided
.svgfiles (1943 x 685) - The ID of each object representing a key of the keyboard (usually a rectangle) should match the character on it (e.g. see properties of the rectangle around character K in the following image)
A key press is simulated by direct modification of the properties of different objects in the SVG file. As an example, if the input text is “HELLO”:
- The appropriate SVG file is loaded (as determined by the selected layout)
- Object with ID “H” is located and darkened
- Frame 1 is rendered
- Object with ID “H” is located and reset
- Frame 2 is rendered
- Steps 2-5 are repeated for characters “E”, “L”, …
Because special characters are not valid SVG IDs (e.g. spaces, new lines, etc.) more expressive IDs are used to represent them (e.g. “space”, “enter”, etc.). For all available special characters, check the provided SVG files.
Inkscape don’t allow IDs from different languages (e.g. “か” or “Ω”) thus forcing us to manually edit the resulting .svg files in order to change the IDs.
Multi-language layouts
YAML
An interesting application of the tool (and the reason I developed it in the first place) is support for multi-language layouts. An example GIF (using the enjp layout) can be seen below:
The main difference with single language layouts is in the YAML files defining them. For example, the enjp layout looks like this:
# contents of file layouts/enjp.yml
file: keyboard-enjp.svg

fonts:
  - Noto-Sans-Mono
  - Noto-Sans-Mono-CJK-JP

mapping:
  'backtick':  ろ
  'minus':  ほ
  'equals':  へ
  'backslash':  む
  'comma':  ね
  'period':  る
  'forwardslash': め
  '1':  ぬ
  '2':  ふ
  '3':  あ
  '4':  う
  '5':  え
  '6':  お
  '7':  や
  '8':  ゆ
  '9':  よ
  '0':  わ
  'Q':  た
  'W':  て
  'E':  い
  [...]
The most obvious difference is the addition of the mappings collection, which clearly defines the mapping between the two layouts (languages). Another less obvious difference is the addition of an extra member to the fonts list. Even if the font to be used for both languages is the same, it should be explicitly stated (otherwise the layout is interpreted as single language).
Multi-language layouts can also be used for mappings between different layouts of the same language, like QWERTY and AZERTY (see layout qwerty_azerty).
SVG
SVGs files describing multi-language layouts look exactly the same as the ones describing single language layouts, with IDs inherited only from the first language (e.g. from English in the enjp layout).
Creating your own layouts
To create a new layout, either for a new language or a new keyboard look, all you need to do is create a new YAML file describing the layout (or copy one of the existing ones) within layouts/ and an appropriate SVG file within assets/ as described above.
The name of the layout is inherited from the name of the YAML file, thus if the file you created is layouts/entest.yml you can select the corresponding layout using:
typingvid -l entest -t "lorem ipsum"
New layouts (especially for other languages) are also greatly appreciated as pull requests on GitHub.
Examples
The simplest command format is the following:
typingvid -t 'www.gavalas.dev' -o "out.gif"

The display defaults to uppercase lettering. If lowercase lettering is preferred, the --force-lowercase option can be used:
typingvid.py -t 'www.gavalas.dev' --force-lowercase -o "out.gif"

The speed of the output video/gif can be controlled by the -s option:
typingvid.py -t 'www.gavalas.dev' --force-lowercase -s 10 -o "out.gif"

If the completed text is hard to read, the --hold-last-frame option allows us to specify a set time (in seconds) for the final frame to be held on screen:
typingvid -t 'www.gavalas.dev' --force-lowercase -s 10 --hold-last-frame 2 -o "out.gif"

Finally, the --invert-colors option can be utilized (at least with the default layouts) for the creation of dark themed videos:
typingvid -t 'www.gavalas.dev' --force-lowercase -s 10 --hold-last-frame 2 --invert-colors -o "out.gif"
Layouts
Typingvid comes with support for multiple layouts/languages. To specify the desired layout use the -l option:
typingvid -l gr -t "ΟΠΕΡ ΕΔΕΙ ΔΕΙΞΑΙ" --hold-last-frame 2 -o "out.gif"
To see all available layouts use:
typingvid --all-layouts
Dual-language layouts are also available, for example:
typingvid -l enjp -t "byte" -o out.gif
Layouts can also be customized, for more information check the Understanding Layouts section.
License
The tool is licensed under the MIT license (LICENSE-MIT or http://opensource.org/licenses/MIT).
Contribution
Unless you explicitly state otherwise, any contribution intentionally submitted for inclusion in the work by you, shall be licensed as above, without any additional terms or conditions.


Leave a Comment
Your email address will not be published. Required fields are marked *